
The first time I tried to trim my dog’s nails I held the clippers for about ten minutes before I even touched his paw. I was terrified of cutting too far and hurting him. He could tell I was nervous, which made him nervous, and the whole thing ended with zero nails trimmed and both of us stressed out on the kitchen floor.
If that sounds familiar, you are not alone. Trimming dog nails at home is one of those tasks that sounds simple until you are actually doing it. The clippers, the quick, the possibility of blood, a dog who wants nothing to do with any of it. It is a lot.
But here is the thing. Once you understand what you are actually doing and why, it gets much easier. Most people who struggle with this are not doing anything wrong. They just have not been shown the right way yet.
This is the complete beginner guide to how to trim dog nails at home, covering everything from the tools you need to what to do when things go wrong.
Why Trimming Your Dog’s Nails Actually Matters
Before getting into the how, it helps to understand why this is worth the effort. Overgrown nails are not just unsightly. They cause real problems.
When a dog’s nails grow too long they start to make contact with the ground with every step. That pressure pushes the nail back into the nail bed, which is uncomfortable and eventually painful. Over time it changes the way your dog walks, shifting their weight backward and putting extra strain on their joints. Dogs with chronically long nails are more likely to develop arthritis and joint problems as they age.
Long nails also catch on things more easily and can tear, which is genuinely painful and sometimes requires a vet visit to treat.
The clicking sound your dog makes on hard floors is actually a useful indicator. If you can hear their nails tapping when they walk, they are already too long. Nails should be short enough that they just barely clear the ground when your dog is standing.
Most dogs need their nails trimmed every three to four weeks. Dogs that walk a lot on concrete or pavement naturally file their nails down and may need less frequent trimming. Dogs that mostly walk on grass or carpet will need more regular attention.
What You Need Before You Start
Getting the right tools makes a significant difference. Here is what you actually need:
Nail clippers. There are two main types. Scissor style clippers work like a pair of scissors and are good for larger dogs with thicker nails. Guillotine style clippers have a hole you insert the nail into before squeezing. Both work well and it comes down to personal preference. For very small dogs, a human nail clipper works fine. Whatever you use, make sure it is sharp. Dull clippers crush the nail rather than cutting it cleanly, which is uncomfortable for your dog.
Styptic powder. This is the most important thing on the list that most beginners do not buy. Styptic powder stops bleeding almost instantly if you cut the quick. It is cheap, it is widely available in pet shops, and having it on hand means that a mistake does not turn into a ten minute panic. Cornstarch works as an emergency substitute but styptic powder is better.
Treats. A lot of them. Small, soft, high value treats that your dog goes crazy for. The whole process works better when your dog associates nail trimming with something they love.
A non-slip surface. Trimming nails on a slippery floor makes everything harder. A rubber mat, a towel, or even a bath mat gives your dog grip and helps them stay calm.
Understanding the Quick
The quick is the blood vessel and nerve that runs through the center of every nail. Cutting into it causes pain and bleeding. Avoiding it is the main thing beginners worry about, and for good reason.
On dogs with white or light colored nails, the quick is easy to see. It looks like a pink line running through the center of the nail. You cut below that pink area and you are safe.
On dogs with black nails it is invisible from the outside, which is why so many people find black nails intimidating. There is a technique for this and it is covered in detail below.
The quick grows along with the nail. In dogs with overgrown nails, the quick extends further than normal, which means you cannot trim back to the ideal length in one session. It has to be done gradually over several weeks to allow the quick to recede.
How to Trim Dog Nails at Home Step by Step
Step 1: Get Your Dog Comfortable with the Clippers First
If your dog has never had their nails trimmed before, or if they are anxious about it, do not jump straight to clipping. Spend a few days just getting them used to the tools.
Let them sniff the clippers. Touch the clippers to their paw without doing anything. Give a treat. Press the clippers gently against a nail without cutting. Give a treat. Squeeze the clippers near their paw so they hear the sound. Give a treat. This desensitization process sounds slow but it cuts the overall time dramatically because you are not fighting a panicked dog every session.
Step 2: Find a Good Position
For small dogs, sitting on a table or counter at your height works well. For larger dogs, having them lie on their side on the floor gives you good access. Some people find it easier to have their dog sit between their legs facing away from them.
Whatever position you use, make sure you can hold the paw firmly but gently without the dog being able to yank it away suddenly. Have someone help you hold the dog if needed, especially for the first few sessions.
Step 3: Hold the Paw Correctly
Hold the paw firmly but without squeezing. Your thumb should be on the pad side and your fingers on the top. Extend the nail by gently pressing down on the pad with your thumb while pushing up slightly with your fingers. This straightens the nail and gives you a clear angle to work with.
Step 4: Make the Cut
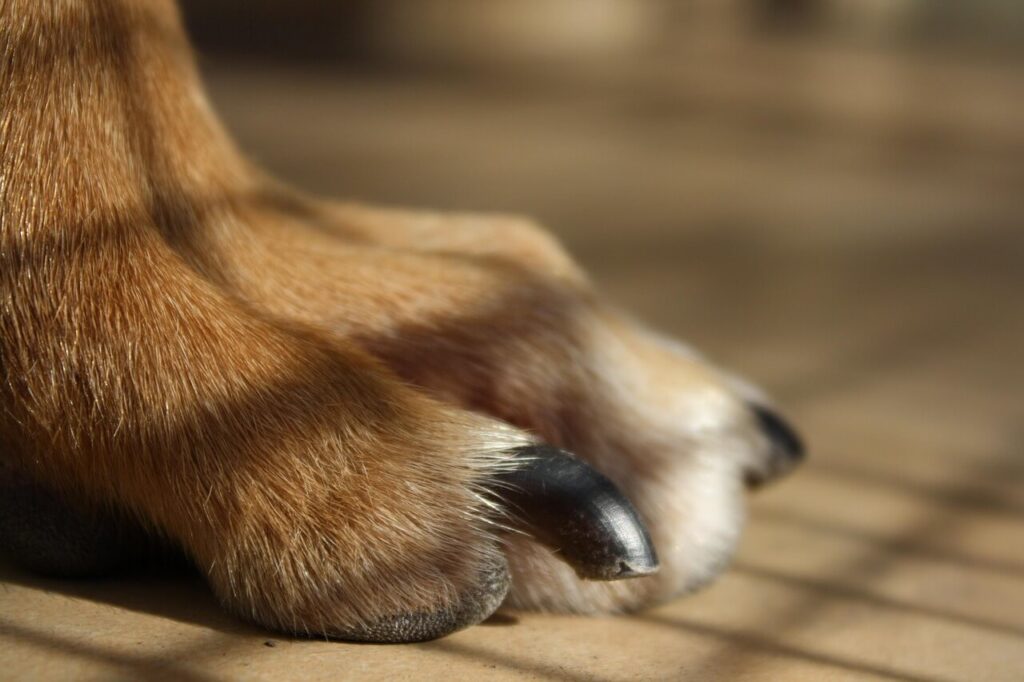
Position the clippers perpendicular to the nail, not at an angle. For light colored nails, identify the pink quick and cut about two millimeters below it. For black nails, start by taking very small slices off the tip and look at the cross section of the nail after each cut. At first it will look white or grey and chalky. As you get closer to the quick the center starts to look darker and you will see a small dark oval or dot appearing. That dot means you are close. Stop there.
Cut with a single smooth squeeze rather than multiple small squeezes, which can cause the nail to crack.
Step 5: Work Through All the Nails
Do not forget the dewclaws if your dog has them. These are the small nails on the inner side of the leg, roughly where a thumb would be. They never touch the ground so they never get filed down naturally and often become the most overgrown nails on the dog.
Give treats between each paw and take breaks if your dog is getting stressed. You do not have to do all four paws in one sitting. Two paws today and two paws tomorrow is completely fine.
How to Trim Dog Nails at Home That Are Black
Black nails intimidate almost every beginner and the slice by slice method is genuinely the safest approach. Take a thin slice off the tip. Look at the cut surface. White or grey means you still have room. A dark center dot or oval means you are at the edge of the quick and should stop.
Work slowly and in good light. A torch or a phone flashlight held under the nail can sometimes help you see the quick through very thin black nails, though this does not work for all dogs.
How to Cut Dog Nails at Home That Are Overgrown
Overgrown nails cannot be brought back to the ideal length in one session because the quick has grown forward along with the nail. Trying to cut them short in one go almost guarantees hitting the quick.
Instead, trim a small amount every week. Each time you trim, the quick gradually recedes and you can go a little shorter the next time. After four to six weeks of this you will usually have the nail at the right length with the quick back in a normal position.
If the nails are severely overgrown or curling into the paw pad, see a vet or professional groomer first. Nails that have curled can cause infections and need careful handling.
How to Trim Dog Nails at Home Without Clippers
If your dog absolutely refuses clippers or you do not have them available, a scratch board is a useful alternative. This is a piece of sandpaper attached to a board that you teach your dog to paw at as a trick. Every time they scratch at it, it files the front nails down naturally.
A nail file or emery board can also be used to smooth rough edges after clipping or to gradually reduce nail length in very nail-sensitive dogs. It takes longer but some dogs tolerate filing much better than clipping.
Walking your dog regularly on concrete, asphalt, or brick surfaces also naturally files the nails and reduces how often you need to trim.
How to Trim Dog Nails at Home When They Are Scared
This is one of the most common problems and it usually comes down to the dog not having been taught that nail trimming is safe. Going back to the desensitization steps in Step 1 is the most effective long term solution, even for adult dogs who have had bad experiences.
For dogs that are genuinely distressed, a lick mat spread with peanut butter or cream cheese can work as a powerful distraction during trimming. The dog is focused entirely on licking while you work through the nails quickly.
Keep sessions short. Two or three nails and done, then build from there. Forcing a scared dog through all four paws in one go usually makes things worse the next time.
If your dog’s fear is severe, ask your vet about anxiety management options. Some dogs do genuinely better with a mild calming supplement before grooming sessions.

How to Stop Dog Nail Bleeding at Home
Cutting the quick happens to everyone eventually. It is not a catastrophe. Here is what to do.
Stay calm. Your dog picks up on your reaction and panicking makes them panic.
Press a pinch of styptic powder firmly against the nail tip and hold it there for about thirty seconds. The bleeding should stop quickly. If you do not have styptic powder, press a small amount of cornstarch against the nail and hold pressure for a minute or two.
Keep your dog calm and off their feet for a few minutes after. Check the nail before letting them walk around to make sure the bleeding has actually stopped.
The nail will be sensitive for a day or two. If the bleeding does not stop within ten minutes or the nail looks infected in the following days, call your vet.
Building It Into Your Routine
Nail trimming gets easier every single time. The first few sessions are the hardest because both you and your dog are figuring out what is happening. By the fifth or sixth time most dogs are reasonably relaxed about it and the whole process takes less than five minutes.
Pair it with other parts of your regular grooming routine. Check the ears while you are at it, our guide on how to clean dogs ears at home step by step walks through that process in the same detail. Brush the coat. Give a good treat at the end of the whole session so your dog has something to look forward to. Check out our recommendations for healthy treats for dogs so the reward is actually good for them too.
If you are still in the early stages of building a routine with a new puppy, our guide on how to take care of a puppy for the first time at home covers grooming, feeding, training, and everything else you need in those first few months.
The dogs who are easiest to groom as adults are almost always the ones whose owners started handling their paws, ears, and mouths from a young age. Start early, stay consistent, and keep the treats coming.Share